How to Transcribe Podcasts and Interviews Accurately
To transcribe a podcast or interview accurately, upload the audio (or paste a public YouTube link) to an AI transcription tool that does three things free auto-captions skip: it separates and labels each speaker, removes filler words and adds punctuation, and lets you correct misheard terms before you export. Then read through once, fix the names and jargon the model got wrong, and export to the format your next step needs — a Word doc for editing, plain text for an LLM, or an SRT if you also want captions.
That last edit pass is the part most guides leave out. For a clean two-person studio chat, an AI transcript is often publish-ready after a five-minute skim. For a four-person panel full of crosstalk, accents, and technical terms, you'll want to budget time to relabel speakers and confirm the vocabulary. This guide covers the full workflow and exactly where that line sits.
I run Subanana, an AI speech-to-text app, so I'll use its transcript mode for the worked examples. The workflow itself applies to any capable tool.
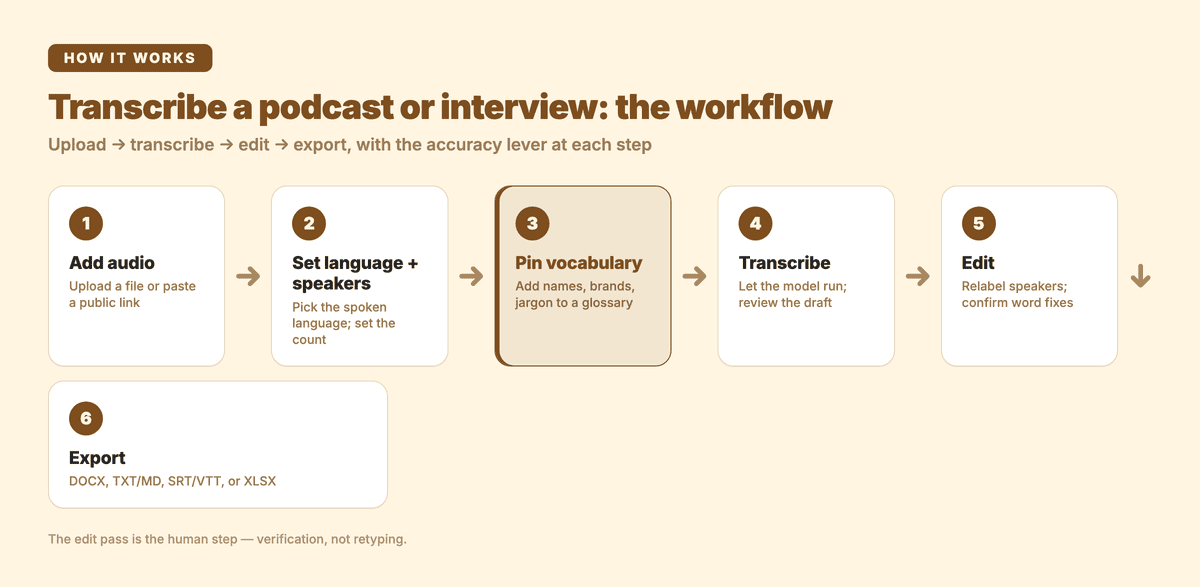 The end-to-end flow, with the accuracy lever called out at each step.
Why do free auto-captions fall short for long-form audio?
The auto-captions you get from a phone recorder or a video platform are built for short, single-speaker clips. They break down on the three things that define podcasts and interviews:
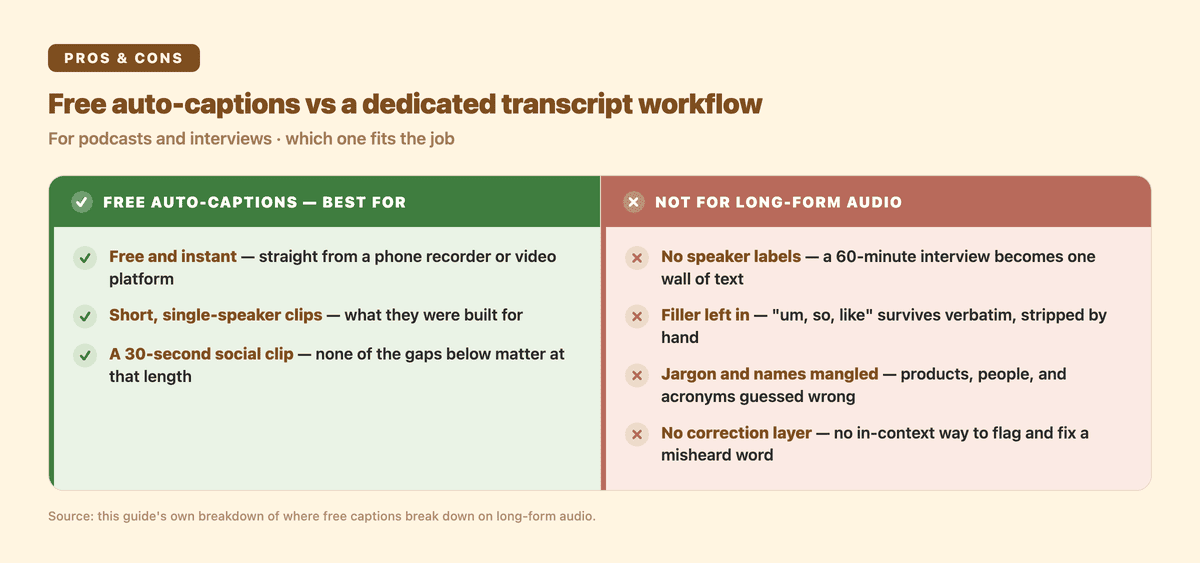 Where free captions hold up, and where a dedicated transcript workflow earns its keep.
- No speaker labels. A 60-minute interview transcribed as one undifferentiated wall of text is almost useless for research. You can't quote a guest, pull their answer, or find who committed to what without listening back.
- Filler and false starts left in. "Um, so, like, I think, you know" survives verbatim. For a transcript you intend to read or repurpose, that noise has to be stripped — by hand, if your tool won't do it.
- Jargon and names mangled. Product names, people, acronyms, and field-specific terms are exactly the words a general model is least sure about. In a technical podcast that's most of the high-value content.
- No correction layer. A raw caption file gives you the output and nothing else — no way to flag a likely misheard word, no in-context way to fix it at scale.
For a 30-second social clip none of this matters. For a 45-minute episode you plan to turn into show notes, a blog post, or research notes, each of these gaps costs you real editing time. That's the gap a purpose-built transcript workflow closes.
What does an accurate podcast or interview transcript actually need?
Four capabilities separate a transcript you can work with from a raw dump:
| Capability | What it does | Why it matters for long-form |
|---|---|---|
| Speaker diarization | Detects and labels who is speaking | Lets you attribute quotes and pull a single guest's answers |
| Filler removal + punctuation | Cleans "um/uh", adds sentence and paragraph breaks | Turns spoken rambling into readable prose |
| Vocabulary control | Pins names, brands, and jargon so they transcribe consistently | Keeps technical episodes from drowning in misspellings |
| Editable correction | Flags likely misheard words and lets you confirm fixes | Gets you to accurate without retyping |
Subanana's transcript mode is built around exactly these. Speaker count can be auto-detected or set manually, filler words are cleaned out, and an auto-punctuation and paragraphing toggle turns the raw stream into readable text — a transcript-mode feature, since subtitles deliberately omit punctuation. Underneath, the tool benchmarks speech-to-text models per language and routes each job to the best performer, with automatic fallback to a second model on any segment that looks unreliable. You're not locked to one engine that happens to be weak on your accent or audio quality.
The upload → transcribe → edit → export workflow
Here is the end-to-end flow for a typical episode, with the decisions that affect accuracy called out at each step.
| Step | What you do | Accuracy lever |
|---|---|---|
| 1. Add audio | Upload the file or paste a public YouTube/Instagram/Facebook link | Use the highest-quality recording you have, not a compressed re-upload |
| 2. Set source language + speakers | Pick the spoken language; auto-detect speakers or enter the count | A correct speaker count tightens diarization |
| 3. Pin vocabulary | Add guest names, brands, and recurring jargon to a glossary | Stops the model re-misspelling the same term every time |
| 4. Transcribe | Let the model run; review the draft | — |
| 5. Edit | Relabel speakers, accept or reject suggested word fixes | This is the human pass — keep it focused |
| 6. Export | Choose the format your next step needs | Match the format to the job (see below) |
A few notes that make a real difference:
- Audio quality is upstream of everything. No model recovers detail that isn't in the recording. Feed it the original file, not a screen-recorded or heavily compressed copy.
- Set the speaker count when you know it. If you recorded a three-person interview, telling the tool there are three speakers gives cleaner labels than leaving it fully automatic.
- Pin vocabulary before, not after. Subanana's glossary lets you add terms one at a time, paste a batch, or bulk-import from XLSX/CSV, and you can keep a workspace-wide list plus per-project lists with per-language tagging. For a recurring show, building the glossary once pays off every episode. A custom-vocabulary feature is common across transcription tools now; the practical edge here is the granularity — workspace plus per-project, tagged by language.
- Use the correction layer instead of retyping. In the editor, an LLM pass flags likely misheard or homophone-swapped words and proposes a fix you approve or reject. It won't silently change anything, and it corrects substitutions — wrong words — rather than detecting words the recording dropped. That's the right tool for cleaning a near-right transcript fast.
When you're done, export to what the next step needs. Subanana exports SRT, VTT, TXT, DOCX (Word), XLSX (Excel), and Markdown, plus a ZIP of everything:
- DOCX — when you're editing the transcript into an article or sending it to a collaborator.
- TXT or Markdown — when you're feeding the transcript into another AI tool to draft show notes or pull quotes.
- SRT or VTT — when the same episode also needs on-screen captions for a video cut.
- XLSX — when you want timestamps and segments in a spreadsheet for indexing.
For repurposing specifically, there's also an in-editor AI chat: you can ask questions about the transcript — "what did the guest say about pricing", "summarise the second half" — and get answers grounded in the actual conversation, which beats re-skimming an hour of text to find one quote.
When is AI enough, and when do you need a human pass?
This is the question that decides how much time a transcript costs you. AI transcription has gotten good enough that for a lot of content it's essentially done on the first run — but not all of it. A useful way to judge before you start:
- AI is usually enough for: one or two speakers, clear studio or headset audio, conversational (non-specialist) vocabulary, and a use case where small errors are low-stakes — internal research notes, a first draft of show notes, searching for a quote.
- Plan a human pass for: three or more speakers with crosstalk, heavy accents or noisy field recordings, dense technical or legal terminology, and anything you'll publish verbatim or quote on the record.
The good news is that "a human pass" rarely means retyping. With diarization, filler removal, and a propose-and-confirm correction layer doing the heavy lifting, the human pass is mostly relabelling a few speaker turns and confirming the vocabulary — minutes, not hours. The work shifts from transcription to verification, which is where your judgement actually adds value.
A note on accuracy claims: be sceptical of any tool that markets a single headline accuracy percentage. Real-world accuracy depends on your audio quality, accents, and subject matter far more than on a number measured on someone else's clean dataset. The honest test is to run a few minutes of your own representative audio through a tool's free preview and judge the output you actually get.
Frequently asked questions
Can I transcribe a podcast straight from a YouTube link? Yes. Alongside file upload, you can paste a public YouTube, Instagram, or Facebook URL and the tool fetches and transcribes it — handy when the episode already lives on a video platform. URL-imported files share the same size and duration limits as uploads, and access-restricted or private content may not import.
Will it tell me who said what? Yes — that's diarization. The tool separates speakers and labels them; you can set the speaker count manually for tighter results, then rename the labels (Host, Guest, names) in the editor.
What audio and video formats can I upload? Common video and audio files work directly, and paid plans support files up to 15 GB or three hours. If your episode is longer, split it. The AI audio-to-text tool page lists the supported inputs.
Is the free tier enough to get a usable transcript file? The free tier is a preview — you can see the result on a short, watermarked sample, but exporting the transcript and copying the text are paid features. It's there to check quality before you commit, not to ship a finished file.
Getting accurate transcripts, faster
Accurate podcast and interview transcription isn't about finding a magic model — it's a workflow: feed it good audio, set speakers and vocabulary up front, let the AI do the bulk, then spend a focused few minutes verifying the parts that matter. The tools handle diarization, filler removal, and correction so the human pass is verification, not retyping.
If you want to try the workflow on your own episode, start in the AI transcription tool or open the app directly. For team and research use across many recordings, the pricing page lays out where the limits sit.