
There are three ways to put subtitles on a YouTube Short: review and correct YouTube's automatic captions in YouTube Studio, upload your own caption file to the Short's Subtitles section, or burn the subtitles into the video before you upload it. Which one you want depends on how much the wording has to be right, and whether the same clip is also going to Reels and TikTok.
The first is fastest: upload the Short, let YouTube transcribe it, then fix what it got wrong. The second is the most accurate, because you control every word and every timecode. The third is the most flexible — branded, always-visible text, and one file you can post everywhere.
This guide walks all three, with the actual Studio menu path for each, plus the Shorts specs that change how you position your caption text. I run Subanana, an AI subtitling tool, so I have a stake in the third method — I have flagged that clearly where it comes up.
The fastest way to add subtitles to a YouTube Short
If your Short is already published and you just want captions on it, this is the whole job:
- Sign in to YouTube Studio.
- From the left menu, select Subtitles.
- Select the Short you want to caption.
- Click ADD LANGUAGE and choose the language of the spoken audio.
- Under Subtitles, click ADD.
- Pick one of the three options YouTube gives you: Upload file, Auto-sync, or Type manually.
YouTube documents this path in Add subtitles & captions, and notes you can also add subtitles during the upload flow rather than after the fact.
If YouTube already generated automatic captions for the Short, you don't start from scratch — you edit what's there. That path is slightly different, and it's Method 1 below.
YouTube Shorts specs that affect your subtitles
Two of these changed since most Shorts tutorials were written, so check them before you cut:
| Setting | What YouTube documents |
|---|---|
| Length | Up to three minutes |
| Aspect ratio | Square or vertical |
| Maximum upload resolution | 1080p |
| Caption placement | Keep text clear of the extreme top and bottom, where the player interface sits |
The three-minute ceiling is the one people get wrong. YouTube's Understand three-minute YouTube Shorts page says that any video uploaded on or after 15 October 2024 "with a square or vertical aspect ratio up to three minutes in length will be categorized as Shorts." A lot of guides still say sixty seconds. The 1080p ceiling comes from Get started creating YouTube Shorts: "You can upload Short videos with a maximum resolution of 1080p."
The caption-placement row isn't a YouTube spec, it's just what happens on a phone. The title, channel handle, description and the action rail all sit over your video. Park your subtitles in the middle third and they survive.
Why subtitles matter on Shorts
Two honest reasons, no invented statistics.
Sound-off viewing is normal. People scroll Shorts on a commute, in a waiting room, in bed next to someone asleep. Without text, your Short is a silent film to a large slice of the people it reaches.
Captions are baseline accessibility. A viewer who is deaf or hard of hearing gets nothing from an uncaptioned Short. That's reason enough on its own.
There's a third argument you'll see everywhere — that captions lift watch time — but I'm not going to attach a number to it, because nobody publishes one you can verify for Shorts specifically.
Method 1: YouTube's automatic captions
YouTube generates automatic captions for Shorts as well as long-form video, and the documented language list is wide. It includes entries for Cantonese/Hong Kong and Chinese, so "my audio isn't English" is not, by itself, a reason to skip this method.
To review and fix them:
- In YouTube Studio, select Subtitles from the left menu.
- Click the Short.
- In the Subtitles column, select Edit.
- For an automatic caption track, select Duplicate and edit, then Continue.
- Edit the lines that are wrong.
- Click Publish.
The Duplicate and edit step is the bit that trips people up. You aren't editing the automatic track in place; you're making an editable copy of it, which then becomes the published track.
Do review it. YouTube's own guidance is blunt about the limits: "automatic captions might misrepresent the spoken content due to mispronunciations, accents, dialects, or background noise. You should always review automatic captions and edit any parts that haven't been properly transcribed." The same page lists what can delay or degrade captions — complex audio, poor sound quality, a long silence at the start, overlapping speakers, and more than one language in the clip. All of that is on the Use automatic captioning page.
Use this method when: the audio is clean, one person is talking, and the Short lives on YouTube only.
Reach for another method when: the Short is full of brand names or jargon, the speaker code-switches between languages, or you're posting the same clip to Reels and TikTok too.
Method 2: Upload your own caption file to YouTube Studio
This is the method I'd default to for anything with a script. You control the wording, the line breaks and the timing, and the result is still a real caption track that viewers can toggle.
- Open YouTube Studio.
- Select Subtitles from the left menu.
- Select the Short.
- Click ADD LANGUAGE and choose the language.
- Under Subtitles, click ADD.
- Select Upload file.
- Choose With timing if your file already carries timecodes, or Without timing if it's plain text.
YouTube's supported caption files page lists SRT (.srt) as a basic format, alongside SubViewer, MPsub, LRC and Videotron Lambda; WebVTT (.vtt), TTML and SAMI sit in the advanced group. One line on that page will save you an hour of wasted styling work: of the basic formats, YouTube says "Only basic versions of these files are supported. No style info (markup) is recognized. The file must be in plain UTF-8." Color, font and position belong in Method 3, not in your SRT.
Two practical variations:
You have the script but no timings. Choose Auto-sync instead of Upload file, paste or upload the transcript, and YouTube times it against the audio for you.
You want to start from what YouTube already produced. Go to Subtitles, click the Short, select Edit next to the language, open Options (the three-dot menu), and choose Download subtitles. Clean it up in whatever tool you like, then upload it back as a new track.
Method 3: Burn subtitles into the video before you upload
Burned-in subtitles are pixels. They're part of the picture, they can't be switched off, and they look exactly the same on every platform you post to. That last point is the real reason high-cadence creators end up here: one captioned vertical file goes to Shorts, Reels and TikTok without re-doing the work three times.
The workflow is always the same shape:
- Generate a caption file from the video's audio.
- Review the transcript and the timings — this is the step people skip and regret.
- Style the captions: font, size, position, background.
- Render the video with the subtitles burned in.
- Upload the finished square or vertical video.
Step 4 is the one that varies. Blackmagic's DaVinci Resolve edit page documents it plainly: "Subtitles can be rendered into the final video or exported as separate TTMLs, SRT or VTT files." That render-into-the-video option is what burn-in means. If you work in CapCut, Premiere Pro or Final Cut Pro, look for the equivalent option in your editor's own caption panel — the labels move around between editors and between versions, so trust the current UI over any tutorial, including this one. I've written the CapCut path up separately in How to add subtitles in CapCut, and there's a Filmora walkthrough too.
Doing steps 1–4 in one place with Subanana
Full disclosure, again: I run Subanana. It's a browser-based AI speech-to-text app, so there's nothing to install, and it covers the generate-review-style-render span of the workflow above in one pass.
How it goes on a Short:
- Get the audio in. Upload the file — video (
.mp4,.mov,.m4v,.webm,.mkv,.mpeg) or audio (.mp3,.m4a,.wav,.ogg,.aac,.flac,.opus). The size ceiling is up to 30 GB per file on every plan, including free — though free transcribes only the first 15 minutes of each file, and the per-file duration ceiling is 8 hours. Or paste a public YouTube, Instagram or Facebook link and Subanana fetches and transcribes it without a local download. Short-form links work the same way long-form ones do. Public posts are the case this covers well; private, age-restricted, members-only and DRM-protected content are edge cases I wouldn't count on. - Pick the source language. There are 95+ of them, and the set is symmetric — anything you can transcribe, you can also translate into. For Cantonese, spoken Cantonese (口語) and Standard Written Chinese (書面語) are separate entries you select in the language picker, in Traditional or Simplified script. It's a language choice, not a convert button.
- Generate, then read it. Subanana benchmarks speech-to-text models continuously and routes each job to the best performer for that source language, with hallucination detection that automatically substitutes a different model when output goes wrong. In the editor you get LLM-assisted proofreading that proposes fixes for misheard and same-sounding words — you approve or reject each one, nothing is applied silently — plus characters-per-second flagging so you can see which cues are too dense to read at Shorts pace.
- Style it once. Save a subtitle style as a workspace template, then apply it to every Short you make, or set it as the workspace default.
- Export. On a paid plan: SRT, VTT, TXT, DOCX, XLSX and Markdown, or a ZIP of all six. You can also render the video with the subtitles burned in, single-language or bilingual — the bilingual SRT puts the source text and the translation one above the other in the same cue, which is the stacked look you see on a lot of HK and TW Shorts.
One thing to be straight about: the free plan does not export subtitle files at all — the only free export is a watermarked video, capped at 5 minutes and 720p. Paid plans drop the watermark and unlock the file exports. Try it free to see whether the transcript quality is there for your audio, but budget for a paid plan if the SRT is what you actually need.
Try it on one Short and see whether the transcript needs more cleanup than YouTube's automatic captions did. That comparison is the whole decision.
Which method fits your Short
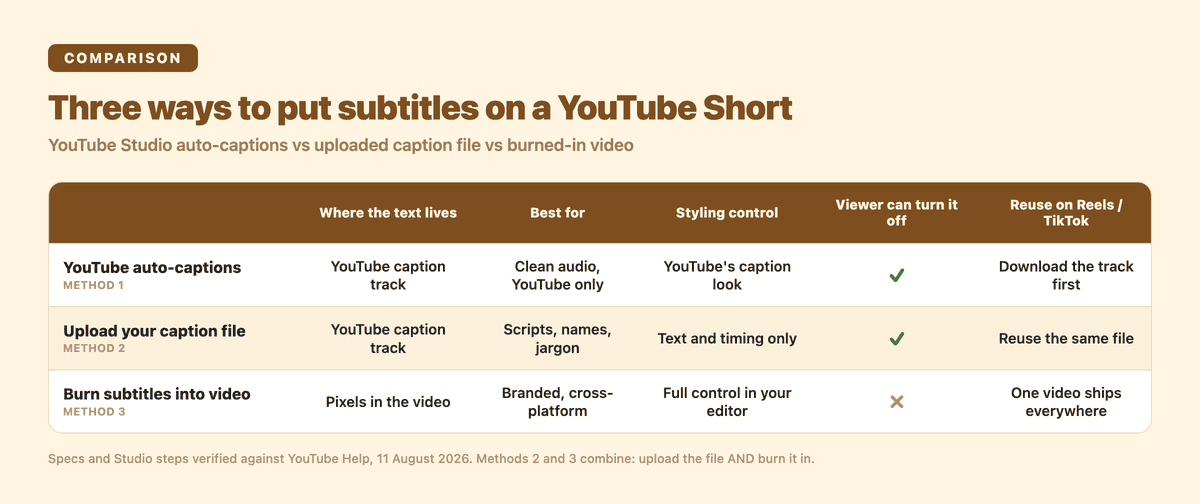
Methods 2 and 3 aren't exclusive — the strongest setup is both, and it costs one extra upload.
| Method | Time per Short | Who it's for | Styling control | Viewer can turn it off | Reuse on Reels / TikTok |
|---|---|---|---|---|---|
| YouTube automatic captions | Minutes, mostly review | Clean audio, YouTube-only publishing | YouTube's caption display | Yes | Download the track first |
| Upload your own caption file | 5–10 min once you have a transcript | Scripts, brand names, jargon, multiple languages | Text and timing; no style markup | Yes | Yes — the same file travels |
| Burn subtitles into the video | 5–10 min once the workflow is set up | Branded look, cross-platform cadence | Full control in your editor | No | One video ships everywhere |
If you want both the branded look and a machine-readable track, do Method 3 and then upload the same caption file to Studio via Method 2. It's one extra step and you get the visual identity plus a toggleable track.
One workflow for Shorts, Reels and TikTok
Every platform's built-in captioning is its own island. A caption track you create in YouTube Studio lives in YouTube Studio; the text you burn into a TikTok inside TikTok's editor stays inside that clip. Publish to three platforms and you've done the same transcription three times.
The fix is to move the source of truth off the platforms. Produce one reviewed caption file per Short, then fan it out: burn it into the vertical video you post everywhere, and upload the same file to YouTube Studio as a caption track. Re-caption once, ship three times.
The same pattern is written up for the other two platforms:
FAQ
How do I put subtitles on a YouTube Short I already published?
Open YouTube Studio, select Subtitles from the left menu, and click the published Short. Click ADD LANGUAGE, choose the language, then click ADD under Subtitles. From there you can upload a caption file, use Auto-sync with a transcript, or type the captions yourself. The Short stays live while you do it.
How do I download YouTube's automatic captions?
In YouTube Studio, select Subtitles, click the video, select Edit next to the language, open Options (the three-dot menu), and choose Download subtitles. It's the quickest way to get a rough draft you can clean up elsewhere and upload back.
How do I add captions in two languages?
Add each language as its own track: ADD LANGUAGE in Studio, once per language, and viewers choose which one they want. If you'd rather show both at once, that has to be burned in — Subanana exports a single bilingual SRT with the source text and the translation stacked in each cue, and can render that straight into the video.
Do burned-in captions replace a caption track?
No, and this is the most common mistake. Burned-in captions are pixels in the picture; a caption file is machine-readable text that viewers can toggle. If you want both a branded look and a text track on the video, do both — burn the captions in, then upload the same file to Studio.
Does YouTube auto-caption Cantonese Shorts?
YouTube's automatic-caption language list includes Cantonese/Hong Kong and Chinese. YouTube's own caveat still applies: accents, dialects and background noise can push the output off, and it tells you to review and correct what comes back. On mixed Cantonese-English audio, budget real review time or produce the caption file yourself and upload it.
Do I need to install software to use Subanana?
No — it runs in the browser. Upload the Short or paste a public YouTube, Instagram or Facebook link, generate the subtitles, review them, and export.
Closing
For an English-language Short that only ever lives on YouTube, automatic captions plus a review pass in Studio is the right amount of work. Anything else — a script worth getting right, a second language, a posting cadence across three platforms — is worth the ten minutes it takes to produce your own caption file and reuse it everywhere.
Generate Shorts subtitles with Subanana, or open the app and run one Short through it.